Archive items manually
An efficient way to reduce the size of your Outlook Data File (.pst) or Exchange mailbox is to regularly archive older items. Unlike a traditional backup in which a copy of Outlook items is made, archived items are moved to a separate Outlook Data File (.pst). Archived items can be accessed at any time by opening the file.
NOTE The Archive command and feature doesn’t appear for any account in your Outlook profile if you include an Exchange Server account and your organization uses Microsoft Exchange Server Online Archive. Your network administrator can also disable this feature.
By default, older Outlook items archived automatically on a regular interval.
You can also manually back up and archive items, in addition to AutoArchive or as a replacement. Manual archiving provides flexibility, and allows you to specify exactly which folders are included in the archive, and which archive Outlook Data File (.pst) is used.
To manually archive Outlook items, do the following:
-
Click the File tab
-
Click Cleanup Tools.
-
Click Archive.
-
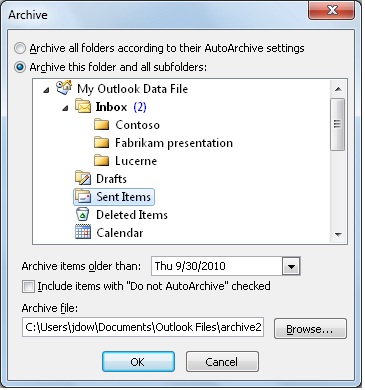
Click the Archive this folder and all subfolders option, and then click the folder that you want to archive. Any subfolder of the folder you select is included in this manual archive.
-
Under Archive items older than, enter a date.

-
If you do not want to use the default file or location, under Archive file, click Browse to specify a new file or location. Browse to find the file that you want, or enter the file name, then click OK. The destination file location appears in the Archive file box.
-
Select the Include items with “Do not AutoArchive” checked check box to include any items that might be individually marked to be excluded from automatic archiving. This option does not remove that exclusion from these items, but instead ignores the Do not AutoArchive check box for this archive only.
Turn off AutoArchive
If you want to archive only manually, you must turn off AutoArchive. Do the following:
-
Click the File tab.
-
Click Options.
-
On the Advanced tab, under AutoArchive, click AutoArchive Settings.
-
Clear the Run AutoArchive every n days check box.
